|
|
Post by djelibebi on Nov 20, 2014 18:16:55 GMT
We're currently in the process of trying to introduce Monty to Jonesy and Scotty. If successful, fingers crossed, then we need to move them to a new cage as our two existing ones are definetely too small for them as it is (they came with them from the animal sanctuary). Temporarily we will try and join them with a makeshift "tunnel" from wood or possibly a concertina-style plastic tube (if we can protect the ends from chewing). However, I want to have a go at building a cage from scratch, hence the need for some feedback ... My thoughts are to try and build one structure that can either house Monty and Scotty / Jonesy separately if needs be, or with the simple use of a trap door, allow them to use the whole cage as one happy gang. I've fleshed out a rough draft in Powerpoint, but I'm no expert in that product and it does have its limitations (like me) for doign this sort of thing, so I'll have to describe some of what I'm trying to achieve as I cannot illustrate it. Here's the basics ...  The floor will be 4 feet by 2 feet (122cm x 60cm) and each level slightly reduced for access. The height of the back will be around 180cm (so I can use three of the "floor" boards as the back. The two sides and the front I propose to be mainly mesh (galvanised steel, 1 inch squares) supported by a "L-shaped" timber frame. The L-shape will provide the structure to hang the mesh on - this will be 1" square galavanised and be stapled to the inside of the frame so as to minimise the opportunity to chew the frame. The top would also be mesh. We think a three sided mesh will give them more light, air and view! Shelves to be supported by the frame and possibly metal shelf brackets. Each shelf to have side "stop it coming through the mesh" protectors, to reduce the maount of sawdust and pooh sweeping we do currently! I plan a floor and two levels for Jonesy/Scotty and floor and one level for Monty - or floor and four levels for combined. For the floor areas, I was thinking a 3ftx1ft metal tray for sawdust, with a 4" hinged door at the front to allow removal and a 4" chuck-it-out protector at the sides. I might put an internal divider in so that the remaining 1ftx2ft space can contain a sandbath or something. This side without the tray will also be where I will have doors to let them out. I'd like four mesh side-opening covered doors to cover the main area above the tray and the levels to allow easy and wide access to clean the shelves, adjust things, etc. It's likely that if the three are together, I will reduce the height by one level - I've already been told this has to look very presentable as a piece of furniture! The white / red "cut-outs" in the floor are to allow access between levels - here I was planning to make them full length and width. The accesses needn't be at the corner, nor restricted to one per level, open to suggestions about this. I also wondered if some form of tree branch might make for access (through a suitable cut-out in the levels). Do they need this or a simple step up between the levels will suffice? The grey circles are for their running wheels. If they operate as a threesome, should I put them all on the same level? If I've done the math, I'm allowing 35-40cm between levels. Nesting boxes, toys and other things I hope can be put as and where required - along with food pots / water hanging from the mesh. So, apart from buying an off-the-shelf cage (!), advice and suggestions for change / improvements are more than welcome, as I'm a novice at what these guys need, and I may already have over-stretched my ability to make it. if anyone knows a good UK supplier for the mesh and the trays, happy to receive a PM if advertising / recommendation of suppliers is not allowed in these threads. |
|
|
|
Post by saddlers on Nov 21, 2014 12:01:21 GMT
Okay my initial comments would be with open mesh on the front and sides you are likely to get a lot of mess, you may be better with some sort of upstand around the edges of the floors to keep the substrate in. Frame members can be easily protected using plaster skim angles, the cage building guide on the forum shows you the type. They are ideal for this and really work wonders. When doing introductions it is better to have a vertical separation, so that the degus can interact with each other on the same level. I would be tempted to choose a point across the centre level and install a vertical mesh divide that can be removed. If you get some timber and fix mesh to both sides of it you end up with a divide with a small gap between which prevents toes getting bitten if there is any aggression. That way you can them have them living as two separate groups for a long time if needs be, but by simply removing the divide you have a large open cage. If you get any problems in the future it can then be put back in place as a temporary measure. Finally watch the positions of the holes through the floors if you get a couple of them lined up you can get quite a drop.
|
|
|
|
Post by deguconvert on Nov 21, 2014 15:23:07 GMT
Looks good to me, and Saddlers covered everything that I was thinking, and I have nothing more to add. :-) I think your illustration works very well!
|
|
|
|
Post by moletteuk on Nov 21, 2014 16:39:58 GMT
Firstly, for temporarily joining cages I would use a homemade mesh tube that is wired in place, you can get 'pop-holes' from John Hopewell that allow you to open and close the tunnel. The size you are proposing is great  I think you might need to think about the stability of the whole thing. If the back is made from 3 pieces and the sides aren't solid, it might be a bit wobbly. It might be fine though, just something to bear in mind as you build. I would recommend solid sides for keeping the mess in and I think it will look more like a piece of furniture this way, but you don't have to, depending on how it sits in the room, maybe you could make one side solid. Good shelf edging does keep a lot of mess in if you go for mesh. If the top is mesh then at least a couple of the shelves need to be permanent and secured very well to the back and sides for structural stability. When you say L shape, am I right in thinking you mean battens that are L shaped in cross section, so you fit the mesh into the cutout? If so, this is quite a neat idea, but I've never seen substantial battens like this for sale. For the amount of battens you will need I would just use square ones for the cost saving, or you could staple on the mesh and then screw on thin facing strips of wood on top, which would look nice and neat. Particularly if you are doing mesh sides, you will need to construct a frame from wood battens to form the structure to attach everything to. You can either make this from good subtantial timber (like 3" square) so that they can only chew the cornes off and not really chew it all away, or you can go a bit slimmer and protect with plastering corners or similar. Your pull out metal trays are great in theory but I think they might be prohibitively expensive unless you have friend to make them for you, plus it complicates the build. I'm not saying don't do it, but give it some careful thought. If I was building again I would use melamine faced furniture board for the shelves/ floor and seal it all around the edges so that it is washable, you need to carefully edge it with chewable wood. Full frontal doors have the advantage that you can always reach any degu, they can't run out of reach. For something like this I would split into 4 doors just so they are a sensible size and weight each. It's worth considering making one level for each section a bit deeper so you can fit a big wheel, just rob some head room from another shelf, as long as you can reach the back, they don't mind one shelf a bit lower. For introductions you definitely want one horizontal level to have a removable vertical divide so that degus can meet through mesh all on the same level. Degus can handle a variety of ways of getting between levels, mine have a couple of jumps, but mainly branches. If you get the holes in the right place, you might be able to put a diagonal branch that runs through a couple of shelves, don't make it too steep, mine don't like it more than 45 degrees. All my shelves have more than one access, but that might not be necessary, it might be advantageous if there is tension in a group though, it allows easier avoidance of a bossy degu. Jump through holes can be fairly small, like 150x100mm or even less, ramps need longer holes to allow for the angle of the ramp/ branch. I haven't worked a lot with mesh, but I haven't seen a great difference in price, you can get it from major DIY shops or builders merchants. Don't go bigger than 1" I can recommend Toolstation or Screwfix for the price and choice of fixings, hinges, brackets and so on. Shop around for battens and sheet materials, you may find timber merchants, sawmills etc cheaper than DIY shops. Have a good look through the 'show us your cage' thread, there are loads of ideas there. If you look in the blog area, there are a couple of cage building ones you might find useful. |
|
|
|
Post by djelibebi on Nov 21, 2014 21:14:52 GMT
Thanks Mods for all your feedback - most useful.
Just to tidy up for your clarity - and mine:
- I did plan to have shelf edging where I was placing the trays to keep the mess inside the cage - well, most of it anyway. The thick green on the diagram should go along the sides, but I couldn't get that to work in Powerpoint!
- Regarding the trays - I was thinking of using "dog trays" which sit in the bottom of dog cages (£25 each?) , but happy to have a go at creating wooden boxes with some form of edge protection as an alternative. What do you seal the wood with for water-proofing? Guess I need to do some costings to see what I'm letting myself in for.
- The back should be made from one sheet - I'll replace the separate boards with the required size from an 8ftx4ft sheet.
- For the doors, they would sit above the thick green on the diagram, so two at the bottom and two at the top, plus two on the side.
- For the battens, I planned to screw wood together - but again, I need to visit some timber merchants to see what's feasible. Perhaps 3" x 1". Shelves would all be fixed to the back and the front part of the frame.
- Sorry for the "Doh!" moment re 2-in-1 cage - we have them side-by-side now, so a vertical split does make more sense. i could put it by the access area I've got in red on the diagram, so Monty doesn't lose too much space.
- A rising branch sounds good - I think if the frame gives me the structural integrity then I have a few options and reducing the weight of the shelves will all help.
We plan to put Monty, Scotty and Jonesy in the bath tomorrow for their first face-to-face introduction. Hopefully they will get on. The signs - as I can read them - look reasonable, which probably means they will have an almighty bust-up. I shall report back.
Meantime, I'll do some more research on materials and your suggestions - thanks again.
|
|
|
|
Post by djelibebi on Nov 21, 2014 22:24:34 GMT
Just been having a browse of the web and started thinking about "metal frame shelving" - has anyone experience of using this as a base for a cage. It would hopefully provide the structural rigidity and I'm guessing it could have a wooden "facia" put on it if you wanted to make it prettier, but the wooden "mesh holder" can be placed on the inside of the metal corners and secured with bolts through the wood and the steel. If the bolt nut is inside, is this an issue for the goos chewing, or would they ignore them? Maybe there's a fixing that can be used that has no hard edge inner or outer? The shelf heights are adjustable and extra ones might be optional extras. They come in a range of sizes. Here's an example that I'm now thinking might form the basis of my cage design, providing I can find a safe and secure way of attaching wood that can then be used for the door and flap support...  Thoughts on this? |
|
|
|
Post by Maravilla on Nov 22, 2014 11:32:57 GMT
This was my very first degu cage, 180x90x135 cm. We did it for the same reasons as you: a solid structure, no way to chew on wooden parts. 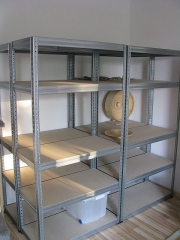   After about one year we decided to build a new cage as we did not like it anymore: too heavy, too ugly, too deep, not very practical when it came to cleaning. To sum up, it did have more disadvantages than advantages. |
|
|
|
Post by djelibebi on Nov 22, 2014 11:59:42 GMT
Maravilla,
Thank you for reply and photos. I can appreciate it's heavy, but I'm hoping I'll not be moving ours too often. Ugly - well, I've seen worse that's for sure. It looks a very good job to me.
Can I ask a few questions ...
How did you secure the mesh to the wood (staples?) and also the wood to the frame?
Regarding cleaning, was that because of the shelf depth - i.e. difficult to reach the back? I was only planning on a depth of 60cm.
What did you put at the back? I assume mesh.
Did you use anything at the sides to stop stuff getting pushed out - i.e. perspex or similar?
Thanks for help.
|
|
|
|
Post by Maravilla on Nov 22, 2014 16:26:56 GMT
How did you secure the mesh to the wood (staples?) and also the wood to the frame? Mesh to wood with staples, wood to frame with screws from the inside. Regarding cleaning, was that because of the shelf depth - i.e. difficult to reach the back? I was only planning on a depth of 60cm. Not only because of the depth. Once, we had problems with mites which found perfect places to hide. It was also impossible to paint the shelves (often enough) to prevent urine to soak. What did you put at the back? I assume mesh. No, sides and back were made of melamine-faced chipboard. It is hard to see as one side and the back are white as the walls. Did you use anything at the sides to stop stuff getting pushed out - i.e. perspex or similar? We had perspex at the doors (about 10 cm), but from outside so it stopped some of the dirt to fall out until you opened the doors  . I would not repeat building a cage from such a shelf. It is faster and easier to build a frame using only melamine-faced chipboard which does not provide any edges to chew on. And by using this material, you save time and money as there is no need to paint all the levels. |
|
|
|
Post by moletteuk on Nov 22, 2014 17:09:54 GMT
It's fine to use nuts and bolts and screws that the degus can access as long as they are well secured, they can attract chewing though. I wasn't aware of metal dog crate trays - interesting, thanks I think the metal shelf unit could be a useful head start if you aren't confident with DIY and can get a unit the size you want. You probably would have to change the shelves or vinyl tiling them could be an option, but sometimes they get chewed at the joins. As Maravilla mentions at the end, if you build using fairly thick sheet materials with solid back and sides and top/ permanent shelves, you don't need to build a frame if you connect the sheets together solidly. You can use fish tank silicon to seal joints, just clean it off really well after you get it pushed into the joint so the degus can't really access it. |
|
|
|
Post by djelibebi on Feb 5, 2015 18:44:39 GMT
There's a well known saying in the military ... "No plan survives first contact with the enemy" ... which I now think can be slightly adjusted to "No cage survives first contact with a degu". After much deliberation, tribulations, re-working and trial and error, we've finally got a new cage for our three goos. Sadly, they are still separate as they have shown no signs of patching up their differences. I've posted a photo here together with details of what we did. |
|


 .
.